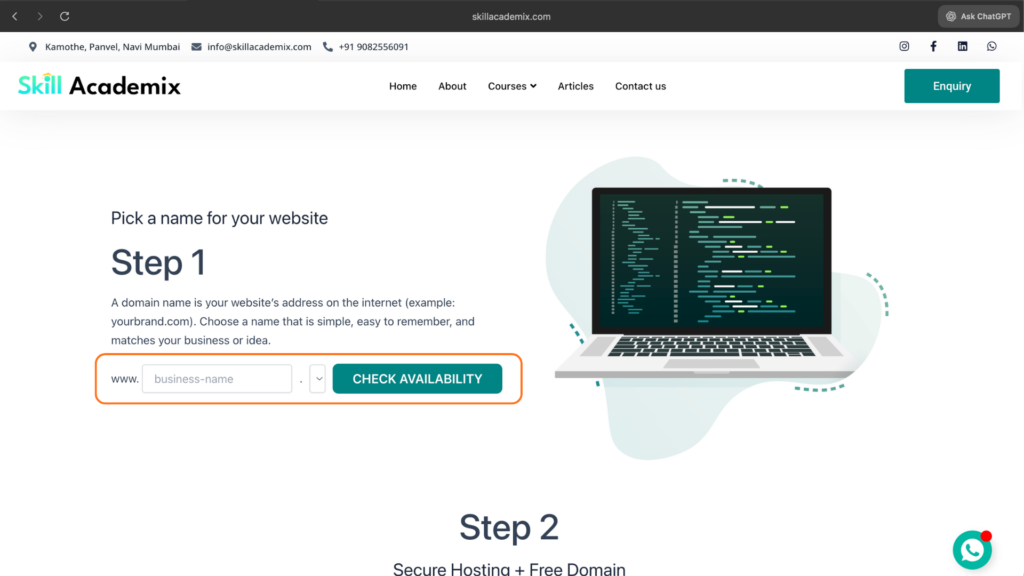
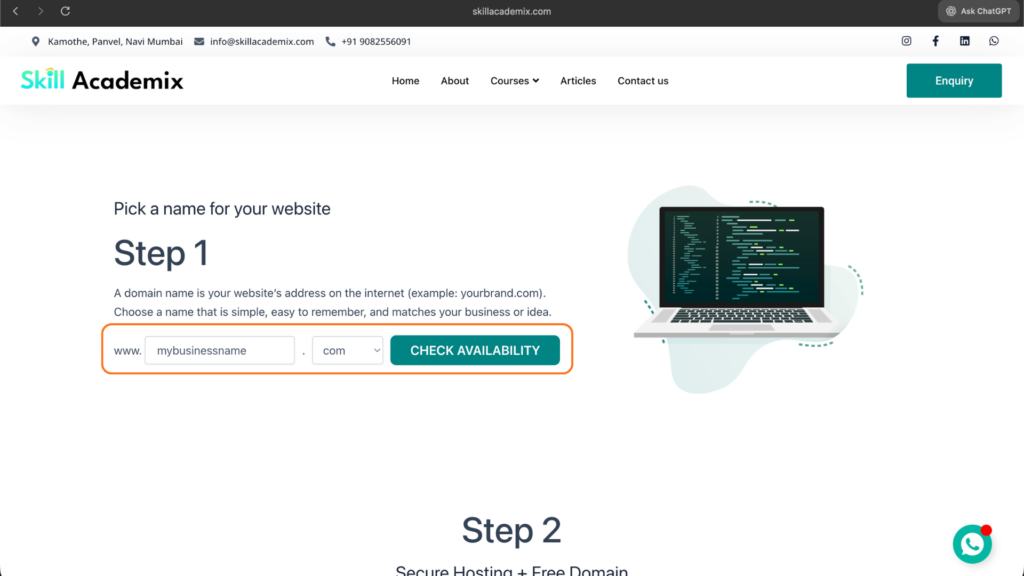
Pick a name for your website
Step 1
A domain name is your website’s address on the internet (example: yourbrand.com). Choose a name that is simple, easy to remember, and matches your business or idea.

Step 2
Secure Hosting + Free Domain
Once you choose your perfect website name, the next important step is getting Hosting + Domain.
Hosting is where all your website data lives and allows your site to load fast and stay online 24/7.
Import & Edit Your Website Design
Step 4
Once your theme installation is complete, follow these three simple steps to bring your website to life using Starter Templates and Elementor.
1. Install the Starter Templates Plugin
After activating the Astra theme, the next step is to install the Starter Templates plugin.
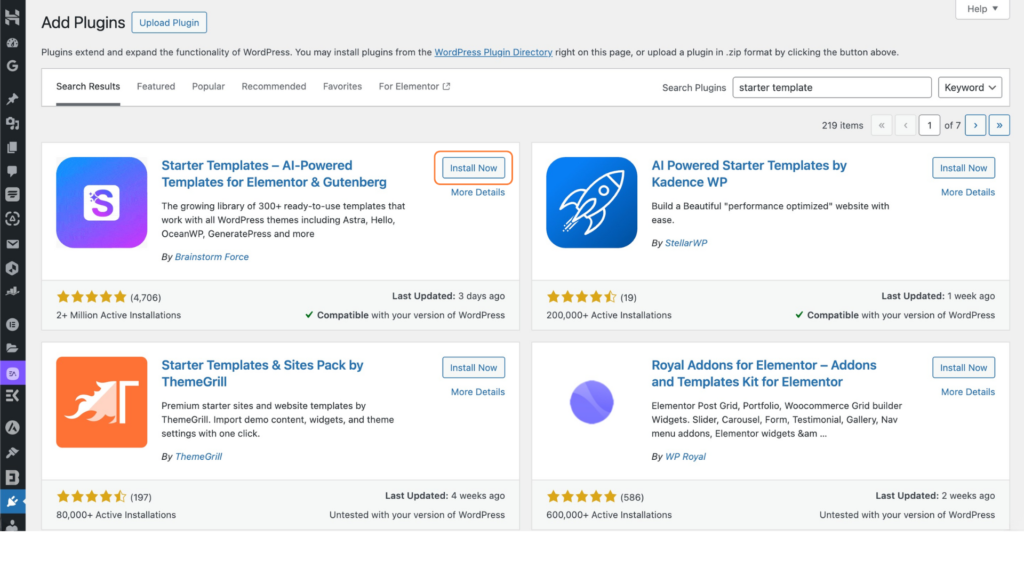
This plugin gives you access to a wide library of ready-made website layouts. How to do it:
- Go to Plugins → Add New
- Search “Starter Templates”
- Install & Activate the plugin
- Open the plugin and click “Edit with Elementor” to begin setting up your design
This makes your editing process faster because Elementor opens directly with a template structure.
2. Select a Template & Import It
Inside Starter Templates, you’ll see a collection of professional designs
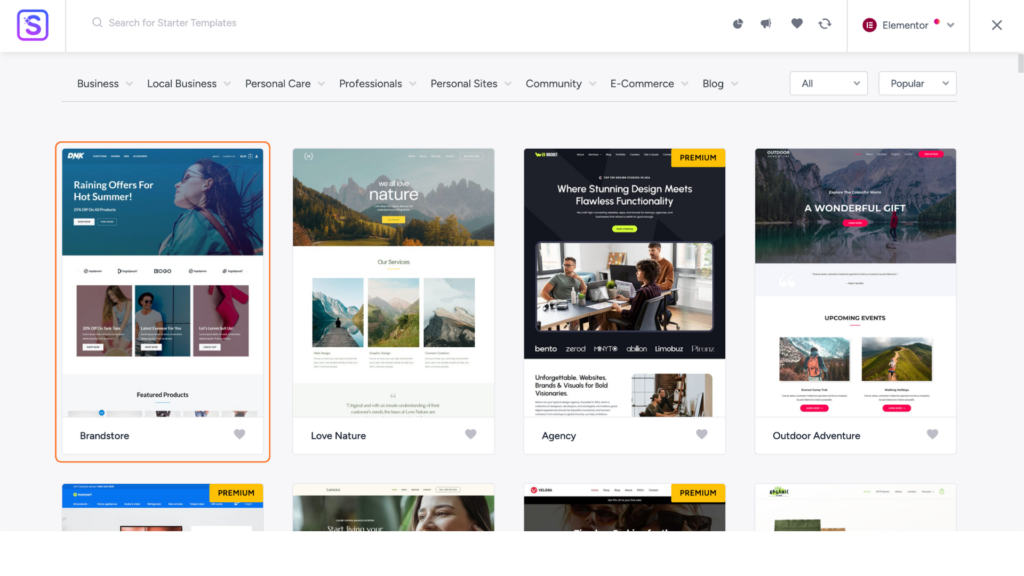
for blogs, business sites, portfolios, and more.
Steps to follow:
- Browse and select the template you like
- Click on the template preview
- Hit “Import Complete Site” or “Import Template”
- Wait for the import process to finish (usually 5–10 seconds)
The system will automatically load all pages, layouts, images, and styling into your WordPress site.
3. Start Editing Your Website Content
Once your template has been successfully imported,
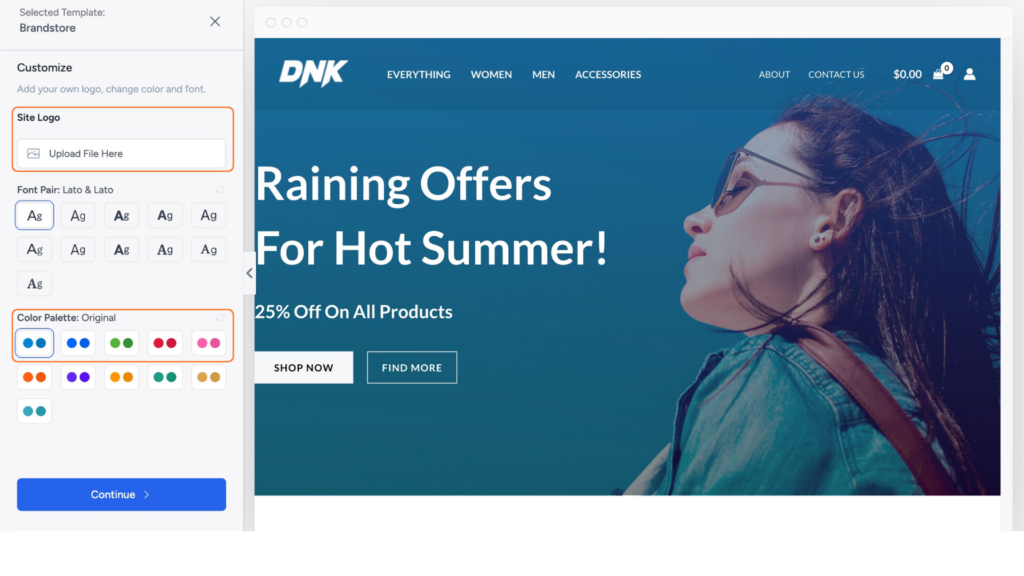
your website is ready for customization.
To edit the design:
- Open any page
- Click “Edit with Elementor”
- Start replacing text, headings, buttons, images, banners, and colors
- Drag-and-drop elements to build your own layout
Elementor makes website editing very simple — whatever you click, you can edit immediately.
Choose Your Theme
Step 5
You’ve successfully installed your theme, imported your template, and edited your content. Your website is now ready to go live. Start adding your branding, updating pages, and sharing your site with the world!
Skill Academix – Complete Guide
This guide will help you understand the basics, follow each step clearly, and build a professional website from scratch.
Table Of Content
The Website Essentials
Step 1: Pick a Domain Name for Your Website
Step 2: Get Hosting with Free Domain
Step 3: Install WordPress on Your Website
Step 4: Choose Your WordPress Theme
How to Make a Website in 5 Simple Steps
Did you know you can build a complete website in just a few minutes when you follow the right process?
And no — this isn’t a clickbait promise.
Thousands of beginners have successfully built their first website using this exact method, and many of them created beautiful, professional-looking sites within the same day.
With the same confidence, Skill Academix is here to guide you step-by-step so that you can easily build your own website — even if you’re a complete beginner.
The Website Essentials
Before we start building, there are three basic elements every website needs:
A Domain Name
Web Hosting
A Website Building Platform
Let’s understand each one briefly.
1. What is a Domain Name?
A domain is the address of your website on the internet — the name people type to visit your site (example: yourbusiness.com).
Choosing a good domain name is important because:
Choosing a good domain name is important because:
- It represents your brand
- Helps build trust
- Makes your website easy to find and remember
2. What is Web Hosting?
Web hosting is the online space where your website files are stored. Whenever someone visits your site, hosting delivers your web pages to their browser.
A good hosting service ensures:
- Your site opens fast
- Your data stays secure
- Your website is available 24/7
3. What Are Website Building Platforms?
Website-building platforms are tools that allow you to create websites without coding. Earlier, designing a website required programming experience. Today, platforms like WordPress, Wix, and Webflow let you build professional sites using:
- Ready-made templates
- Drag-and-drop editors
- Easy customization tools
This means anyone can design a website quickly.
4. Why Choose WordPress as Our Platform?
Among all popular website builders such as Wix and Squarespace, WordPress stands out as the most powerful and widely trusted option.
Here’s why:
- Used by 43% of websites worldwide
- Beginner-friendly and flexible
- Supports thousands of free themes & plugins
- Ideal for business sites, portfolios, blogs, and eCommerce
Major brands like Mercedes-Benz, Sony Music, Walt Disney, and even the White House use WordPress — proving how reliable and scalable it is.
This is why Skill Academix recommends WordPress for all beginners who want full control, unlimited customization, and long-term growth for their website.
Now that you understand the essentials of how websites work, let’s start building your website step-by-step.
We will be following a simple 5-step process:
- Step 1: Pick a domain name for your website
- Step 2: Get hosting with a free domain
- Step 3: Install WordPress on your website
- Step 4: Choose & install a website theme
- Step 5: Edit the website content
Let’s begin with the first and most important step: choosing your domain name.
Your domain is your website’s identity on the internet.
It’s the name people type into their browser to reach your site — for example, yourbusiness.com.
Since your domain becomes your online brand, choosing the right one sets the tone, builds trust, and helps users remember you easily.
Many platforms offer “free domains,” but they usually come with:
- Poor security
- Unprofessional extensions
- Limited control
For a professional website, always choose a paid, trusted, and secure domain from a reliable provider.
1. Use Your Business Name
If you’re creating a website for your business, using your brand name makes your site instantly recognizable.
2. Use Niche Keywords (for blogs or personal sites)
If you’re making a personal blog or niche website, include keywords that describe your content.
For example:
skillacademix.com → teaches about websites.
This helps users understand your niche immediately and improves your visibility on Google.
3. Keep It Short & Simple
Short domain names are easier to type, remember, and share.
4. Choose Easy-to-Pronounce Words
Avoid complicated or regional words that may confuse visitors.
5. Pick the Correct Domain Extension
Common extensions include:
- .com — Commercial websites (most recommended)
- .org — Organizations
- .net — Networks
- .co — Companies or corporations
If you’re unsure, choose .com — it is widely trusted and globally recognized.
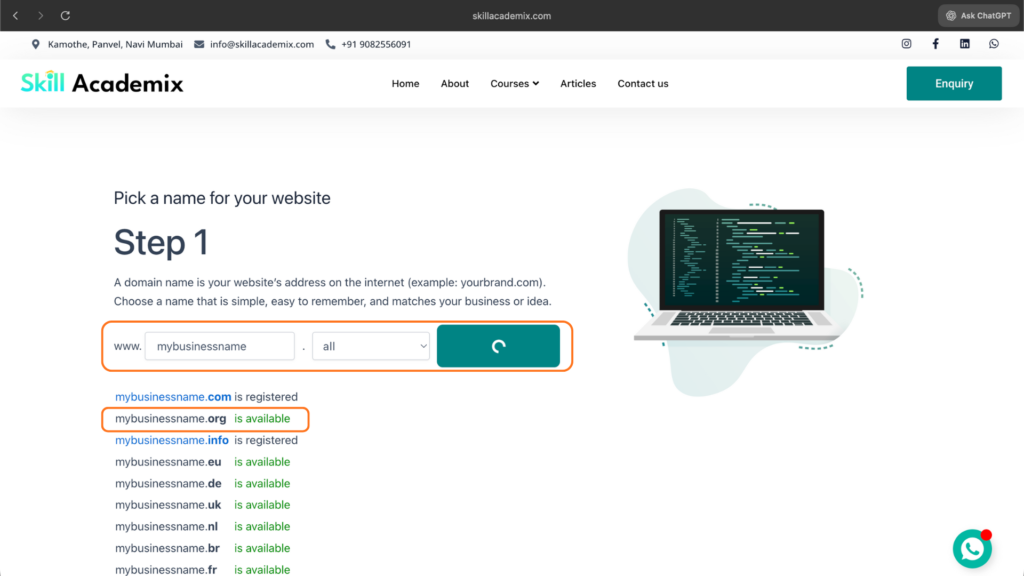
6. Check Domain Availability
Once you finalize a name, search for it using any domain checker tool.
If the name is available, great!
Before you buy it, here’s a useful secret:
👉 You can get your domain for FREE when you purchase hosting from Hostinger.
This helps you save money and also keeps your domain + hosting under one platform, which makes website management easier.
Now that you’ve selected your domain name, let’s move to the next step.
Now that you’ve chosen your domain name, the next step is to get web hosting.
Hosting is where all your website files, pages, and images are stored. When someone visits your site, your hosting server loads your content and displays it instantly.
There are many types of hosting, but for beginners, the easiest and most cost-effective solution is shared or WordPress hosting with a free domain included.
After reviewing multiple options, we recommend Hostinger for Skill Academix students because it offers great speed, simplicity, and affordability.
Why Are We Choosing Hostinger?
Hostinger is one of the best hosting providers for beginners because it offers:
- Free Domain on Most Plans
(available on Premium, Business & Cloud plans — not available on Single Web Hosting) - Fast & Secure Servers
(Guaranteed uptime and optimized speed globally) - Beginner-Friendly hPanel
Easy dashboard with clean navigation - Great Pricing
Affordable plans suitable for students & small businesses - 24/7 Live Support
Real human support whenever you need help - WordPress Optimized
Perfect for building websites using WordPress
Hostinger gives a free domain on most hosting plans (except the Single Web Hosting plan).
Here’s how the process works step-by-step:
1. Choose Your Hosting Plan
Go to Hostinger’s hosting page and select:
- Premium Web Hosting (recommended)
- Business Web Hosting
- Cloud Hosting
Avoid Single Web Hosting if you want a free domain.
2. Complete Your Hosting Purchase
Select your plan duration, fill in your details, and complete your order.
Your hosting account will now be created in Hostinger’s dashboard (hPanel).
3. Set Up Your Server
After purchase, Hostinger will guide you through a quick setup wizard where you:
- Choose WordPress installation
- Set your website name & login details
- Complete server configuration
Once setup is done, your hosting environment is ready.
4. Claim Your Free Domain from hPanel
Unlike other hosting providers, Hostinger allows you to claim your free domain after your server is set up, not during the checkout.
Here’s how to claim it:
Step-by-step to claim domain:
- Go to your hPanel
- Open the Domains section
- Click “Claim Domain”
- Select “Choose Your Free Domain”
- Enter your desired domain name
- Choose your extension (.com, .in, .net, etc.)
- Confirm & register your domain for free (1st year)
That’s it!
Your free domain is now activated and connected to your Hostinger hosting plan.
Alternative Hosting Providers
If you prefer exploring more options, here are some alternatives:
- WebSpaceKit
- Bluehost
- Dreamhost
- Cloudways
- Kinsta
Each hosting provider offers different pricing, renewal charges, and performance levels.
However, for beginners, Hostinger offers the best balance of speed, price, reliability, and ease of use.
Now that you’ve set up your hosting with Hostinger and connected your domain from GoDaddy, it’s time to install WordPress — the platform where you will design your website.
Hostinger makes this process easy with a guided setup, so you don’t need any technical skills.
Let’s see how to install WordPress on your host.
WordPress installation on Hostinger involves a few simple steps inside your hosting dashboard (hPanel).
1. Log in to Hostinger
Go to Hostinger.com and log in to your account.
Once logged in, you will see your hPanel (hosting control panel) dashboard.
2. Start the WordPress Installation
In hPanel:
- Click on Add Website
- Choose WordPress as the website type
3. Enter Your WordPress Credentials
You will be asked to enter:
- Email address
- Password
These details will be used to log into your WordPress admin later.
After entering them, click Next.
4. Select Your Theme
Hostinger will ask you to choose a theme during setup.
- Click Select Theme Instead
- Choose Astra
- Click Next
We will customize the Astra theme later using templates and Elementor.
5. Skip Plugin Installation
When asked to install plugins during setup:
- Select Do Not Install Plugins
- Click Next
This keeps your site clean to begin with. We’ll add plugins later.
6. Connect Your Domain
Now, Hostinger will ask:
“What domain or subdomain would you like to use?”
Here you must:
- Go to your GoDaddy dashboard
- Copy your domain name
- Paste it into this field
- Click Next
WordPress setup will now begin on your Hostinger server.
7. Setup Progress
The installation will take a few minutes.
Once complete, you will be redirected to the WordPress admin panel.
Close this tab and go back to your Hostinger dashboard.
Connect Your GoDaddy Domain to Hostinger
Since your domain is bought from GoDaddy and your hosting is on Hostinger, you need to update the nameservers so your domain points to Hostinger.
How to Update Nameservers in GoDaddy
- Log in to GoDaddy
- Go to My Products
- Find your domain → Click DNS
- Scroll to Nameservers → Click Edit
- Choose I will use my own nameservers
- Go back to Hostinger hPanel and copy the nameservers provided there
(e.g., ns1.hostinger.com, ns2.hostinger.com) - Paste them into the GoDaddy nameserver fields
- Save changes
⚠️ Note: DNS propagation can take up to 24 hours, so don’t worry if your site doesn’t show immediately.
Your WordPress Website Is Live!
Once DNS propagation is complete:
- Your domain will point to Hostinger
- WordPress will be installed and ready
- Your website will be live on the internet
However, at this stage your site doesn’t have any content or design — it will look like a blank WordPress site.
But don’t worry — we will design your website in the next steps!
What Are Themes in WordPress?
WordPress themes are ready-made website designs that control how your website looks and feels.
Instead of designing everything from scratch, themes allow you to import a complete layout and simply edit the content.
Using a theme makes website designing simple, fast, and beginner-friendly.
Some themes are created for specific purposes like:
- eCommerce websites
- Photography portfolios
- Blogs
- Business or corporate websites
Other themes are multi-purpose, meaning they can be used for almost any type of website.
Types of WordPress Themes
There are two main types of WordPress themes available:
1. Free Themes
Free themes are perfect for beginners. Many of them offer enough features to build a professional and functional website.
2. Premium (Paid) Themes
Premium themes come with advanced design options, extra features, dedicated support, and higher customization flexibility.
They are useful when your website requires complex layouts or advanced functionality.
👉 Choosing between a free or premium theme completely depends on your website goals and requirements.
How to Choose the Right WordPress Theme
Before selecting a theme, always keep your website’s purpose and audience in mind.
For example:
- If you’re building an online store, choose a theme that supports WooCommerce.
- If it’s a business website, look for clean design and professional layouts.
Important points to check before choosing a theme:
- Make sure the theme is compatible with the latest WordPress version
- Check if the theme is regularly updated
- Choose a responsive theme (works well on mobile, tablet & desktop)
- Ensure it includes essential features like contact forms or eCommerce support
- Read user reviews and ratings before installing
Skill Academix Recommended FREE WordPress Theme – Astra
At Skill Academix, we recommend Astra as the best free WordPress theme for beginners and professionals.
Why Astra is the best choice:
- One of the most popular WordPress themes globally
- Extremely lightweight, which means faster website loading
- Optimized for high performance & speed
- Highly customizable without any coding
- Comes with hundreds of free pre-built website templates
- Fully compatible with Elementor, Gutenberg, and other page builders
- Easy integration with plugins and tools
- Trusted by reputed organizations like NASA & Stanford University
For all the features Astra provides, it is one of the fastest and most reliable WordPress themes available.
Other Recommended WordPress Themes
Apart from Astra, here are a few good free and premium themes you can explore:
- Modern
- Readit
- Shamrock
- Hueman
- Divi (Elegant Themes – Premium)
How to Install Astra Theme on Your Website
Installing Astra is simple and beginner-friendly. You just need to follow these three steps:
- Download the Astra Theme
- Install & Activate Astra in WordPress
- Import Astra Starter Templates
Once Astra is activated, WordPress will guide you to install Starter Templates, which is required to import ready-made website designs.
Installing Starter Templates
Starter Templates is Astra’s official template library.
It allows you to choose a complete website design and import it into your site with just one click.
How it works:
- Install the Starter Templates plugin
- Choose Elementor as your page builder
- Browse website designs
- Click Import on your selected template
After importing, you can easily customize everything — text, images, colors, and layout.
Now your website design is ready.
Next, let’s move to the final step where we start editing the website content using Elementor.
This is the final and most exciting step of building your website.
Why? Because this is where your website actually starts feeling personal.
In this step, you will:
- Add your own content
- Replace images and text
- Customize the layout
- Design your website exactly the way you want
All of this is done using Elementor, a powerful and beginner-friendly page builder in WordPress.
How to Edit Any Page Using Elementor
To edit any page on your website:
- Open the page on your website
- Click “Edit with Elementor” at the top
You will be redirected to the Elementor editor, where you can customize your website using drag-and-drop.
Elementor allows you to design pages visually — no coding required.
How to Edit Text on Your Website
Editing text is extremely simple:
- Click on any text you want to change
- Start typing your own content
To edit button text:
- Click on the button
- Use the left-side settings panel
- Change the button text instantly
All changes appear live on your screen.
How to Change Images on Your Website
To replace images on your website:
- Click on the image in the template
- Go to the image settings in the left panel
- Click “Upload Files”
- Drag and drop your image or select one from your system
Your new image will be updated immediately.
How to Save Your Website Design Changes
After editing text and images, saving your work is very important.
- Click the “Update” button at the bottom of the Elementor panel
⚠️ If you exit the page without saving, your changes will be lost.
Always click Update before closing the editor.
How to Edit Header & Footer in WordPress
WordPress allows you to edit the header and footer separately from page content.
Edit Header
- Go to Appearance → Customize
- Click on Header
- Modify logo, menu, buttons, or layout
Edit Footer
- Open any page
- Hover over Edit with Elementor (do not click)
- Select Footer from the dropdown
- Edit footer content like text, links, and social icons
How to Create a New Page or Post
Creating new content is easy:
- Click “+ New” in the WordPress dashboard
- Select Page or Post
- Start editing using Elementor or the default editor
Your website is your digital foundation on the internet — whether it’s for business, personal branding, blogging, or eCommerce.
Thanks to powerful tools like WordPress and Elementor, building a professional website is now simple, fast, and beginner-friendly.
We hope this Skill Academix guide helped you understand how to create a website using WordPress in a clear and practical way.
Now it’s your turn to explore, practice, and build with confidence